How to Transfer Bell Email to Outlook in Simple Steps?
The Bell.net users have their reasons to import emails from Bell webmail into Outlook. This is why, in this article, we will share two simple methods to transfer Bell email to Outlook easily. Also, we will see the factors that lead to migration. Let’s start the article with an introduction to Bell Mail.
Know About Bell.net
Bell Internet, (formerly known as Sympatico Mail) is a Canadian Internet service provider. It is the largest internet provider in Canada, which also provides email services along with internet services to its subscribers. The Sympatico Bell email provides many features, such as a user-friendly interface, mobile-friendly application, ad-free inbox, and many more. But still, some users want to move their emails to other email clients, such as MS Outlook.
To add Bell Mail to Outlook, there are several reasons for it. Some want to take advantage of the Outlook application or some for their personal reasons. So, below we share with you a user query that helps you understand this issue more clearly.
“I worked for a Canadian company and had a Sympatico Bell email account. Now, I want my Bell emails on my personal Outlook account. As of now, I no longer work for that company. But the problem is I don’t know how to transfer the files. Therefore, suggest a method that can help me move the emails.”
From the above query, you will have a clear understanding of the issue. There are also many benefits to setting up your Bell email in Outlook 365 mailbox, aka Outlook.
Benefits from Transferring Bell Email to Outlook
By exporting your emails to Outlook, you will get many benefits that can help you in your work. Therefore, below we will explain common advantages to transferring the emails.
- In terms of security and privacy, Outlook provides excellent security measures, such as password-protected files, two-step verification, spam filtering, etc. This makes your data more secure than the Bell webmail.
- Users can also get the benefits from other Microsoft products like MS Word, MS Excel, Teams, SharePoint, etc. to improve productivity, collaboration, and communication.
- You can safely store your emails on your local computer. Outlook allows you to save your data in offline mode.
- There is an auto-archive option in Outlook that can help you backup your file without any issues.
So, it is very beneficial to transfer Bell email to Outlook. If we talk about the methods to backup Bell email to Outlook. Then, there are solutions available that you can use. In the upcoming section of the blog, we will explain each method one by one.
Set Up Emails from Bell to Outlook Manually
Users can manually configure their Sympatico Bell email to Outlook by using the IMAP or POP3 servers. So, with the help of this, you can export your emails to their email program. For this, first enable the IMAP/POP3 of your Bell account, then follow the steps below.
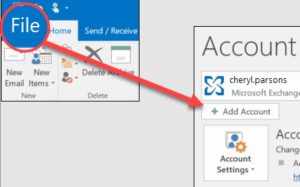
- Step 1: Log in to your Outlook program and go to the “File” menu. Click on the “Add Account” option.
- Step 2: Enter your Bell email username, email address, and password in the respective fields.
- Step 3: Click “Manual setup” and press the “Next” button.
- Step 4: Choose the “IMAP” option. Type the following details.
- Incoming Mail Server: imap.bell.net
- Outgoing Mail Server: smtp.bell.net
- Incoming Port number: 993, Outgoing Port number: 587
- Encryption Connection: SSL for both the options
- Step 5: Write down Bell email address and password. Connect the account.
- Step 6: After that Test your account, and your configuration is complete.
Once restarting your Outlook software. All your Bell emails will be in the Outlook 365 mailbox. If you are having problems using this solution, then the next method will help you.
Forward Bell Emails to your Outlook
There is another simple method which you can use to export your emails in Outlook. In this, we forward the Bell emails to Outlook ID, this is easy but applies to few emails. Here are the steps you can use to move your emails.
- Step 1: Sign in to Bell webmail and go to the “Settings” page.
- Step 2: Search the “Mail Forwarding” section and enable the option.
- Step 3: Enter your verified Outlook email address.
- Step 4: Choose whether you want to keep the copy of your forwarded emails or delete emails after forwarding.
- Step 5: Click on the “Save” button. Then, your email will automatically forward to Outlook.
These two are manual solutions to transfer Bell email to Outlook. They are free to use and simple, however, you may face difficulty while performing the task. Next we will explain issues by using these methods.
Common Problems When Using Manual Solutions
- The process is time-consuming, as there are many steps you have to follow.
- You need professional knowledge to use the IMAP server. Therefore, it will be difficult for non-technical users to use the options.
- There can be errors which become difficult to connect your accounts.
- Some data can be missing after migrating them into Outlook.
Therefore, the manual options are not effective ways to add Bell email to Outlook 365. But don’t worry, there is another method that will help you import the data.
Migrate Bell.net Emails to Outlook with Expert Solution
For the great solution, Corbett IMAP Migration Software, you can use. The tool is an excellent choice because it is created using advanced technology. With this, you can easily transfer any IMAP-based email accounts to another account. The utility supports 100+ IMAP email accounts, including Office 365. Also, it preserves your data integrity and folder hierarchy while migrating your data. To use this tool, below are the steps you may follow.
Guide to Transfer Bell Email to Outlook
- Step 1: Download the software. Click on the “Open”, then “Email Accounts” >> “Add Account” button.
- Step 2: Enter your Bell email details and click the “Add” button.
- Step 3: All your data will be present in the software. Preview the emails.
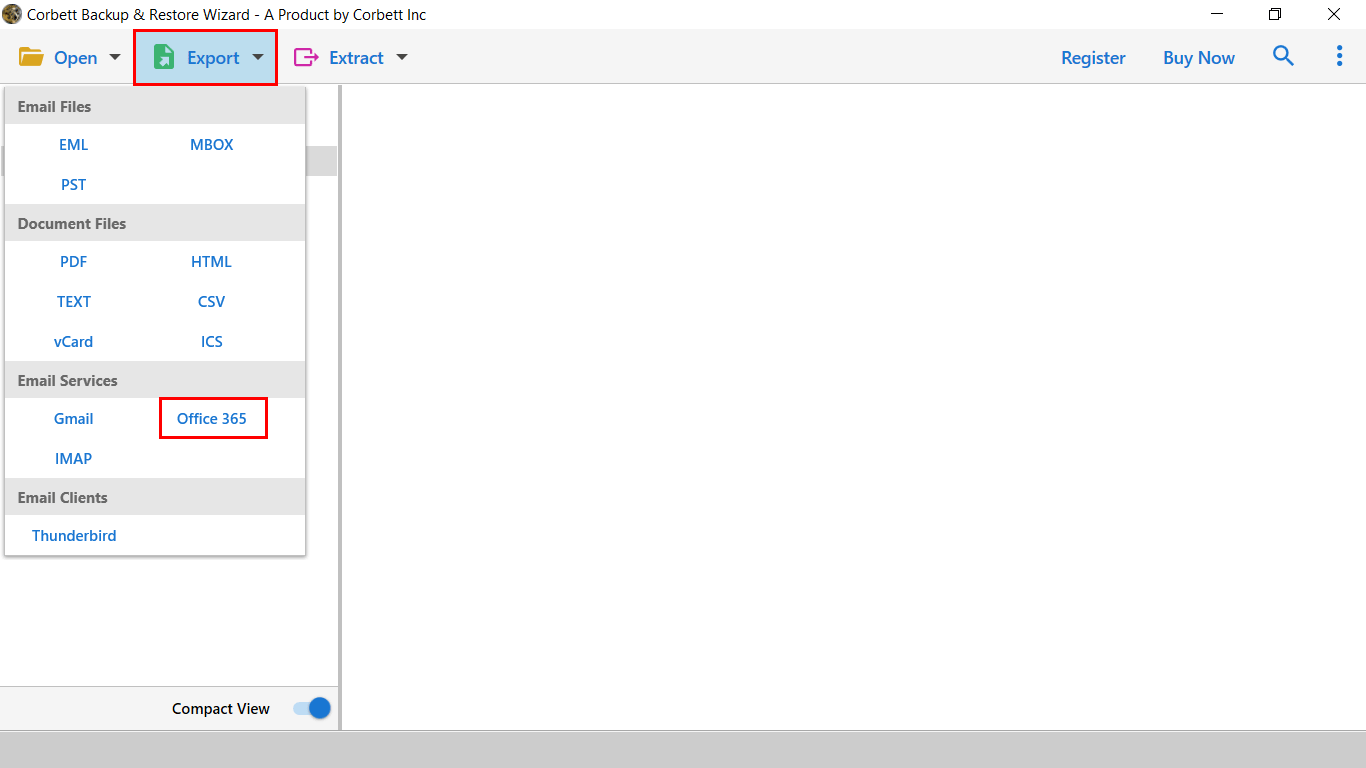
- Step 4: Click on the “Export” option and then the “Office 365” button.
- Step 5: Browse the location and hit the “Save” option.
By following these steps you can successfully export Bell emails to PST. In addition, it also provides additional features.
Amazing Features of Wizard
- You can import the emails in various email and document file formats. Like EML, MBOX, PDF, HTML, etc.
- It auto-detects the IMAP settings when entering the correct email address.
- The software is also used to extract attachments, email addresses, etc. separately.
- You can sort out your email using the advanced search options.
- Prior knowledge is not required to use the software.
- The tool is available in all Windows OS versions, including 11, 10, 8, 8.1, etc.
These are some of the features that the tool provided. By using them, your work will be much quicker.
To Conclude
Many users want to transfer Bell emails to Outlook, but some have difficulty doing it. Therefore, this article explored three different ways to add emails to your Outlook 365 mailbox. The manual options are free and easy, but they can create problems. However, if you use the professional software, then you will not have any issues. If you have any, you can contact our support team.
Frequently Asked Questions
Q. How can I transfer Bell emails to Outlook on Mac?
Ans. You can simply move your Sympatico Bell into Mac Outlook by configuring your account to the Outlook program. Or forward it to the email address.
Q. What would I do if Bell email failed to sync with Outlook?
Ans. Failure to configure your account with Outlook can be due to many reasons, including incorrect account settings, internet network failure, outdated Outlook, etc. To solve the problem, check your IMAP/POP settings, review your network connection, update Outlook software, disable third-party antivirus, remove and read the Bell email account, or contact the Bell.net support team.
Q. How can I export my Bell emails?
Ans. To download the Bell emails, you save them in EML or PDF using the Download and Print option in the program. For this, select the email you want to export. Click on the three buttons and select the Download button or choose the Print option to save the file in PDF format.
Read More:


