Expert Guide Create a PST File in Outlook Web App (OWA)

Throughout this article, we will discuss how to create PST File in Outlook Web App. To accomplish this, we will provide both a manual solution along with an automated utility. Stay tuned until the end to find out which method would be the best fit for the users to create an Outlook PST file.
Here’s Why to Create an Outlook PST File?
Outlook Web App is a cloud-based email client and it could be hazardous to sustain your data on the internet. Therefore, it becomes necessary to save your OWA emails in PST format.
- On a cloud-based email client, your data is prone to cyberattacks on a daily basis.
- OWA export to PST format makes it easier to open and access emails in the desktop Outlook application.
- Backing up data on a regular basis helps avoid sudden attacks or data hacking.
- Can access Outlook data information in offline mode with no need of an internet connection.
- Emails and folders can easily be organized into distinct PST files in order to manage the email storage.
How to Create PST File in Outlook Web App?
- First, install and run the OWA Exporter on your Windows system.
- Second, click Open > Email Accounts > Add Account.
- Enter your OWA login credentials.
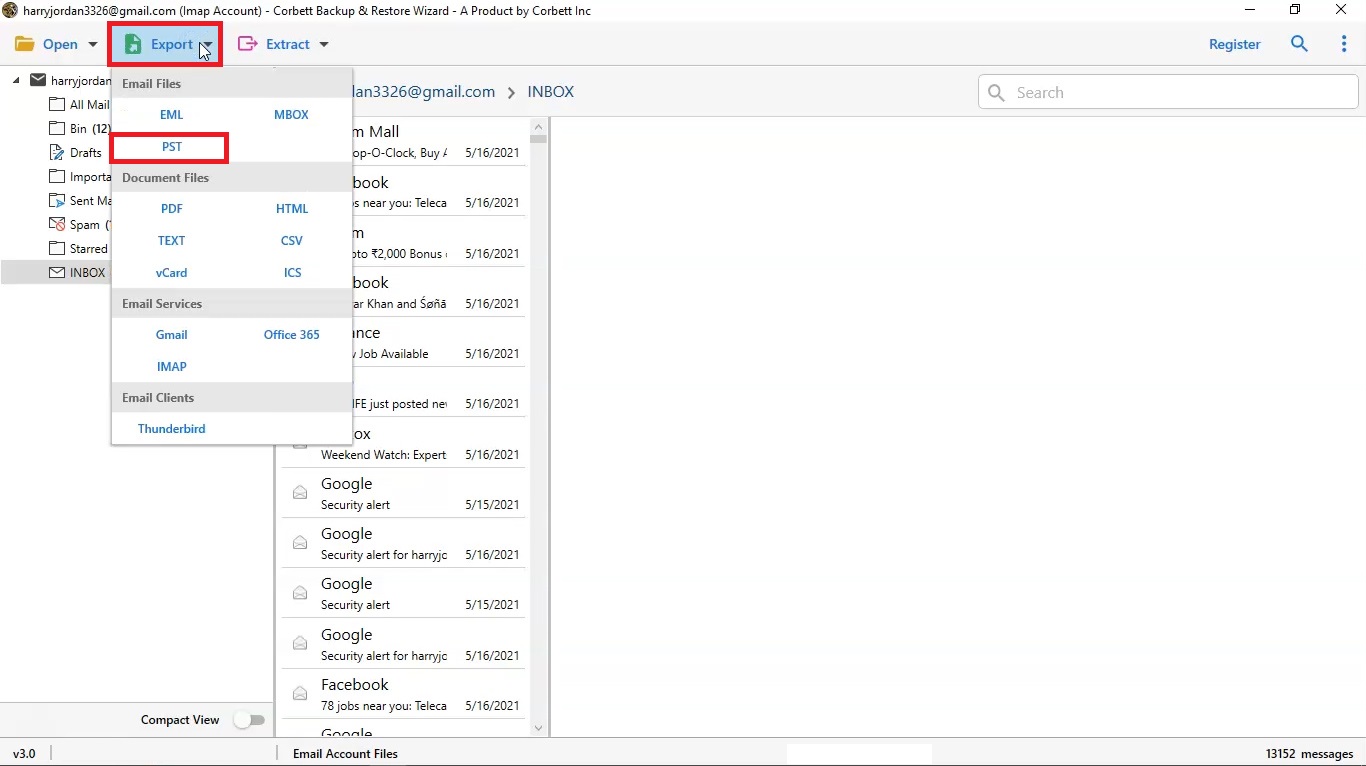
- Afterwards, click Export and select PST format.
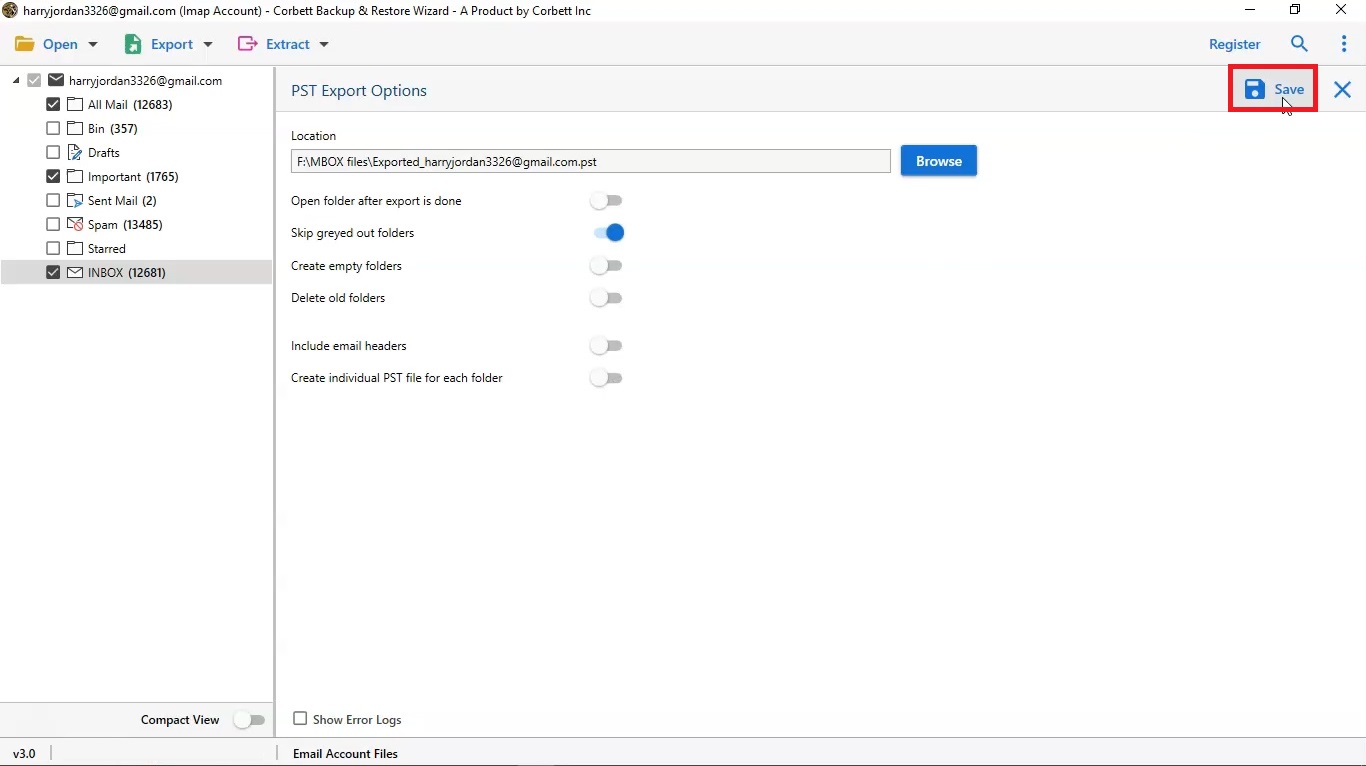
- Finally, apply the Advanced filters and hit Save.
Create an Outlook PST File with Manual Solution?
Although there is no direct manual method to create PST from Outlook web, one can try a workaround that will help you accomplish the task. In order to follow through with this method, you must have a desktop Outlook account. Here’s how to execute the technique.
- Start the MS Outlook application and click on File.
- Then, choose Add Account from the provided options.
- Next, provide your Outlook Web Mail address and click the Connect button.
- Look for the dialogue prompt “Account Successfully Added” and hit the Done button.
- Upon restarting Outlook, you will see a dialogue box saying “Outlook is setting up a local copy of your mailbox”.
- At last, choose “Send/Receive All Folders (F9)” to start adding emails to the Outlook desktop application.
Now that users are done with adding their OWA account to the desktop version of Outlook, user can simply use the Import/Export feature of Outlook to export the added emails in PST format.
Limitations to This Method
- Tedious & Time Consuming: This manual method involves two different procedures, and thus, is extremely time consuming. This makes users avoid this method in order to save their precious time.
- Requires Technical Expertise: To perform the manual solution, one must have the appropriate technical insight to understand and follow each step. Due to this, the method becomes complicated to understand for users.
- Outlook Dependent: To follow this method, one must have desktop Outlook installed beforehand. This method is impossible to follow for users who do not have a desktop Outlook account.
- Requires Manual Intervention: Since this is a manual method, it requires the user’s manual intervention at each step. Due to the lack of automation, this method becomes overwhelming and quite a hassle for users to follow through.
- Prone to Data Loss: As we know, this method requires technical insight and manual intervention. Due to this, one could easily miss a few steps in between the procedure or make mistakes, especially novice users. A single mistake like this could lead to data loss.
These are the drawbacks to this method that hinder it from becoming the preferred choice of users. Hence, to eliminate such issues we have a utility handpicked by multiple technical experts.
Expert Solution to Create PST File in Outlook Web App
To avoid all the unnecessary hassle and trouble, we have brought you an expert-favorite utility i.e., Corbett Outlook Backup Tool. This remarkable utility is fully equipped with well-designed features specially made to cater to all needs of users. It exports PST files from OWA emails in an effortless and hassle-free manner. Along with that, this utility is fully supported by all versions of the Windows Operating System.
The software tool is specifically constructed to assist users create an Outlook PST file, outlook.com, Exchange Online accounts, and Office 365. One of the top features of this tool is that it simplifies the backup process of the user’s entire mailbox data, which also involves attachments, emails, calendars, contacts, etc. into a PST format without messing up the folder structure and the integrity of the data.
Detailed Steps to Export Emails from Outlook Web App to PST
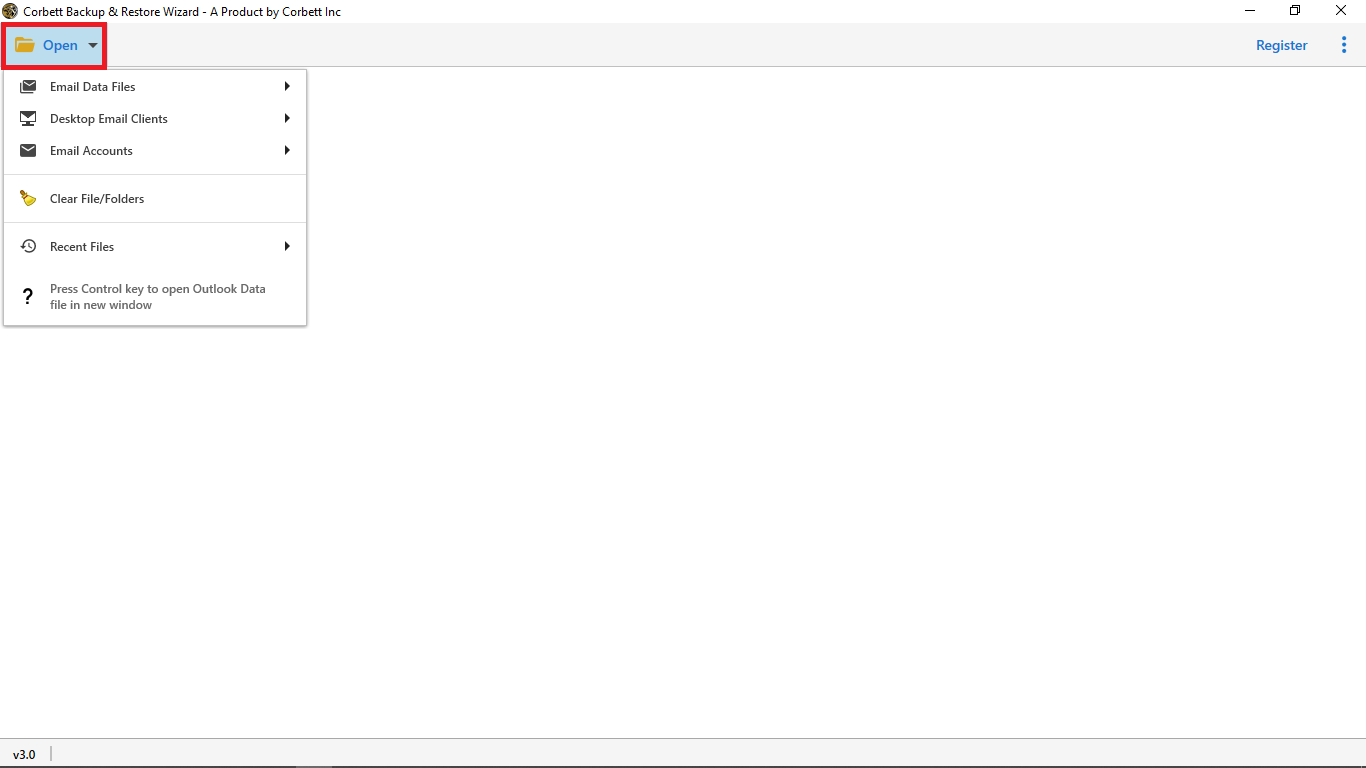
- Download and install the expert utility on your Windows system and click on the Open button in the top-left corner.

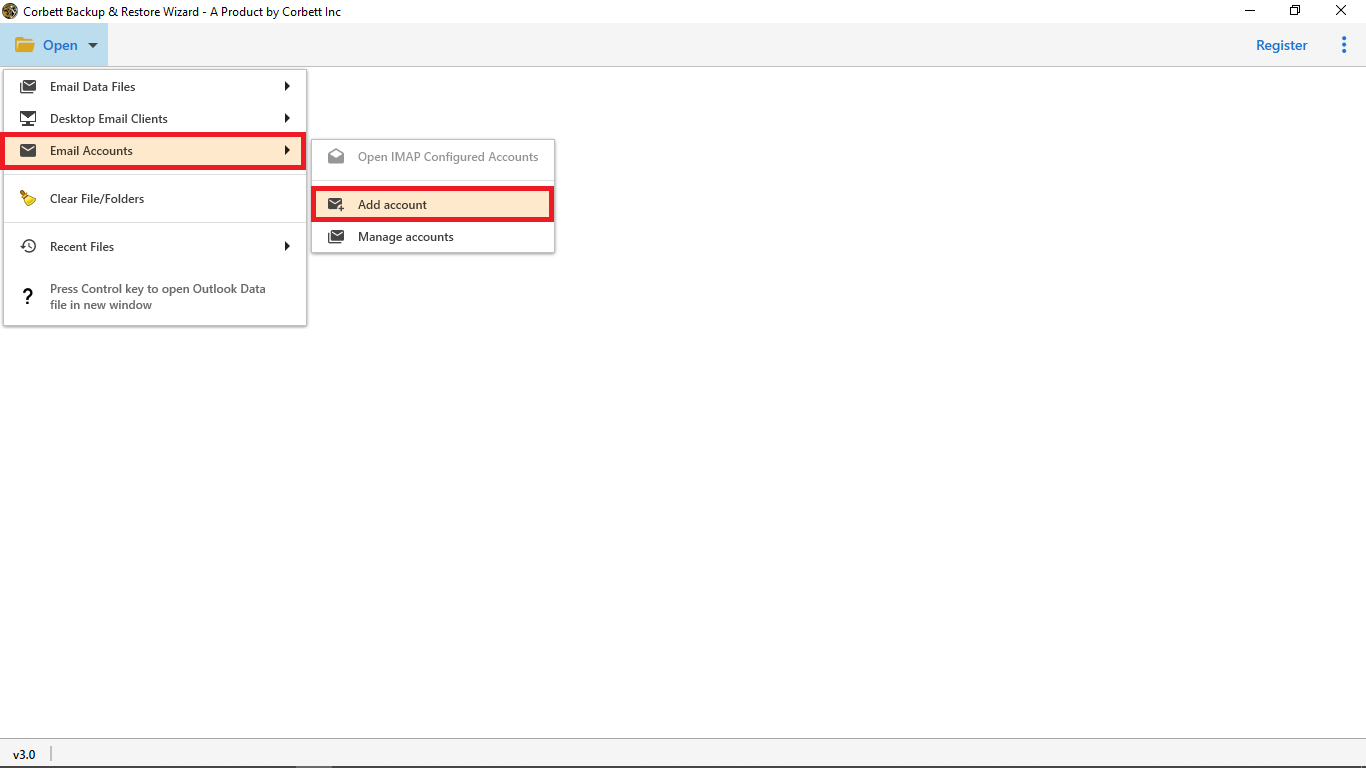
- Next, select Email Accounts >> Add Account from the dropdown menu.
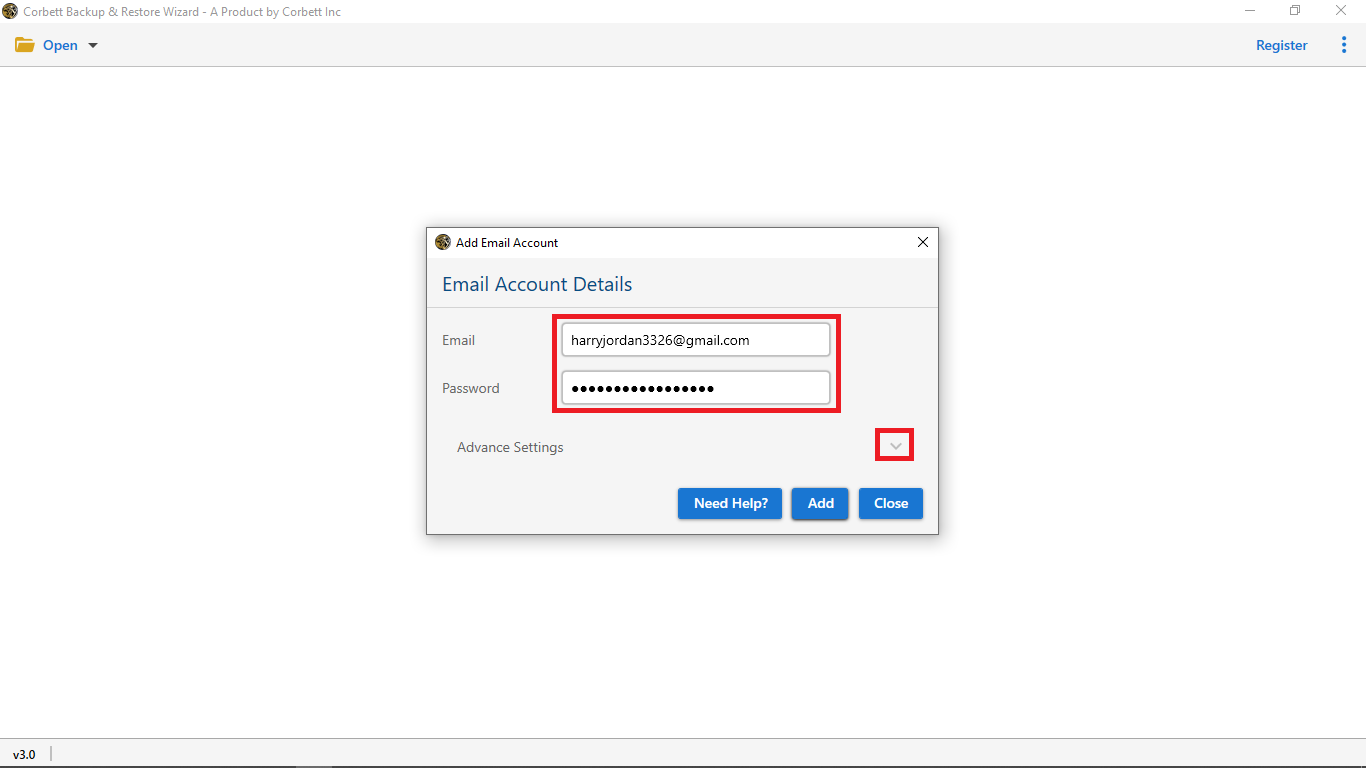
- Now, add your Outlook Web App login credentials in the required fields to add your OWA account with the software.
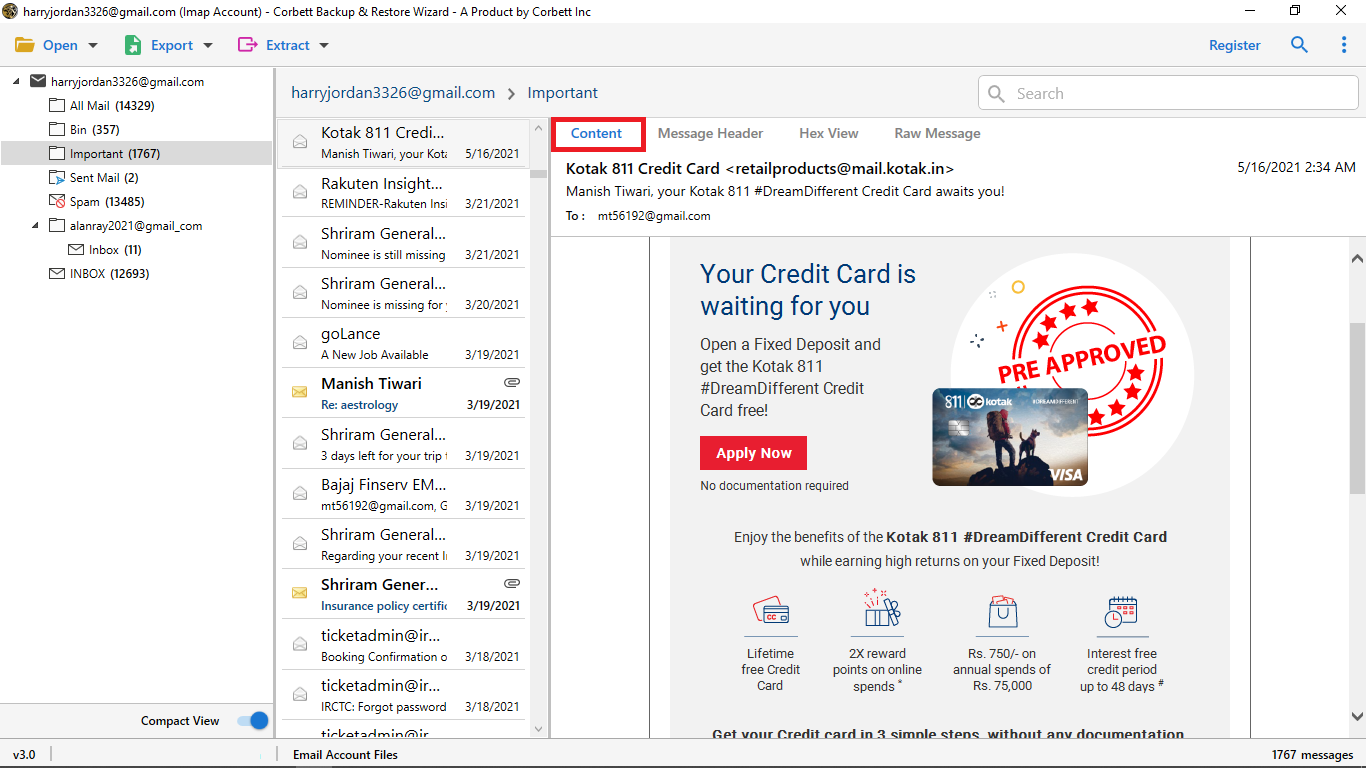
- Preview your uploaded mailbox in the dedicated panel with four view modes. Use the advanced filters as per your preference.
- Select the “Export” tab and choose the “PST” format to create PST file in Outlook Web App.

- Lastly, use the advanced options as you require and click the “Save” button.
And that is all for the hassle-free steps to export PST from Outlook Web App. Furthermore, there are numerous benefits of choosing the expert utility to accomplish the task. Let us proceed and have a look at them.
Advantages of Using the Expert Utility
- Bulk Export OWA Emails to PST: This astonishing software is highly capable of bulk exporting your Outlook web app emails. This feature greatly helps in saving time and effort for users. Thus, regardless of how many emails you want to export to PST format, you can do so easily with this tool.
- Auto-Detects and Loads Mailbox: You only need to enter your OWA username and password i.e., account credentials and the software will automatically load your entire mailbox into the preview panel. This feature is highly advantageous as it does not require manual configuration of accounts.
- Dedicated Preview Panel: This magnificent comes with a dedicated panel that previews your entire uploaded mailbox. It consists of four different modes that display different attributes of your email messages. The said four modes are Content, Message Header, Hex View, and Raw Message.
- Preserves Original Formatting & Hierarchy: The expert favorite utility preserves and maintains the original formatting and hierarchy of user OWA data. This means you can be sure that your OWA mailbox data structure will be untouched and unaltered throughout the backup process.
- Compatible with All Versions of Windows OS: Regardless of which version of Windows OS you use, this utility can be downloaded and used on any Windows machine without any issues. This is because this expert tool is compatible with all Windows (32-bit & 64-bit) versions.
To Conclude
In this blog, we discussed how to create a PST file in Outlook Web App. We shared a manual solution along with an expert-recommended utility to accomplish the task. Whichever solution you choose depends solely on your requirements and preferences.
Read More Articles: