Informative Guide to Add Hostinger Emails to Outlook
About Hostinger Mail
Hostinger is a web hosting application to create custom websites. Apart from this, it also offers email services for professional as well as personal use. When purchasing the hosting plans, Hostinger provides you a free email account based on your domain.
Whereas, Outlook is an email client from Microsoft. It is a desktop based program which provides many advanced features such as auto-archiving, scheduling emails, creating meetings, managing appointments, tasks, etc. That’s why most prefer Outlook to manage their emails.
Why Add Hostinger Emails to Outlook?
Overall Hostinger is a nice email program with tits own good features. But compared with Outlook, you will get many benefits, which we mentioned below.
- MS Outlook provides excellent security measures such as password protection, email encryption, multi-factor authentication, spam filtering, etc. Having your Hostinger emails in Outlook protects your data from deletion or corruption.
- In the Outlook, you will get 100 GB of free mailbox storage. With this you can save multiple emails in your program easily and securely.
- There is an advanced filter option that allows you to sort and organize your emails.
- You can configure multiple accounts in your Outlook, So you can easily manage your Hostinger and Outlook emails from one account.
This is why users want their Hostinger emails to the Outlook 365 mailbox. The process of exporting your mailbox would be easier if you properly follow the steps. But, before following the solutions there are some prerequisites which make the process easier and faster.
Prerequisites Before Migration Process
In this, we will provide a list of tasks that you must do before going through the steps. These are as follows.
- Configure Domain and connect MX Records: By configuring your domain’s DNS, you can make sure that you use the correct email server. Which means that you make sure that your domain point to the right email address. for this follow the steps below.
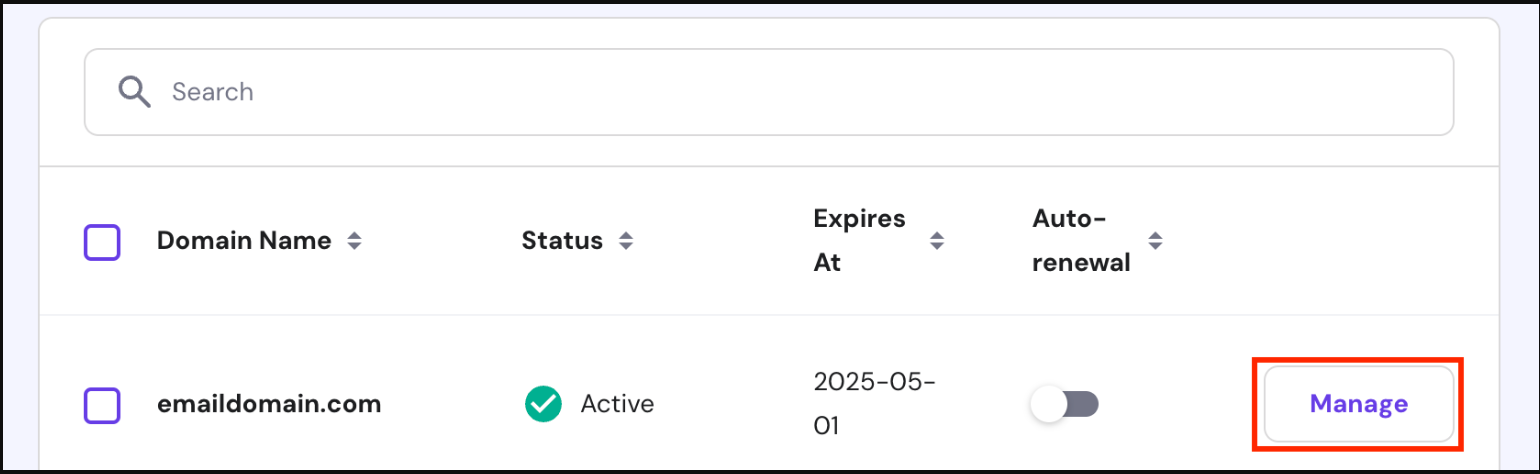
- First, log in to hPanel account, and click on the Domain option at the top.
- Select the Manage button which is next to your domain.
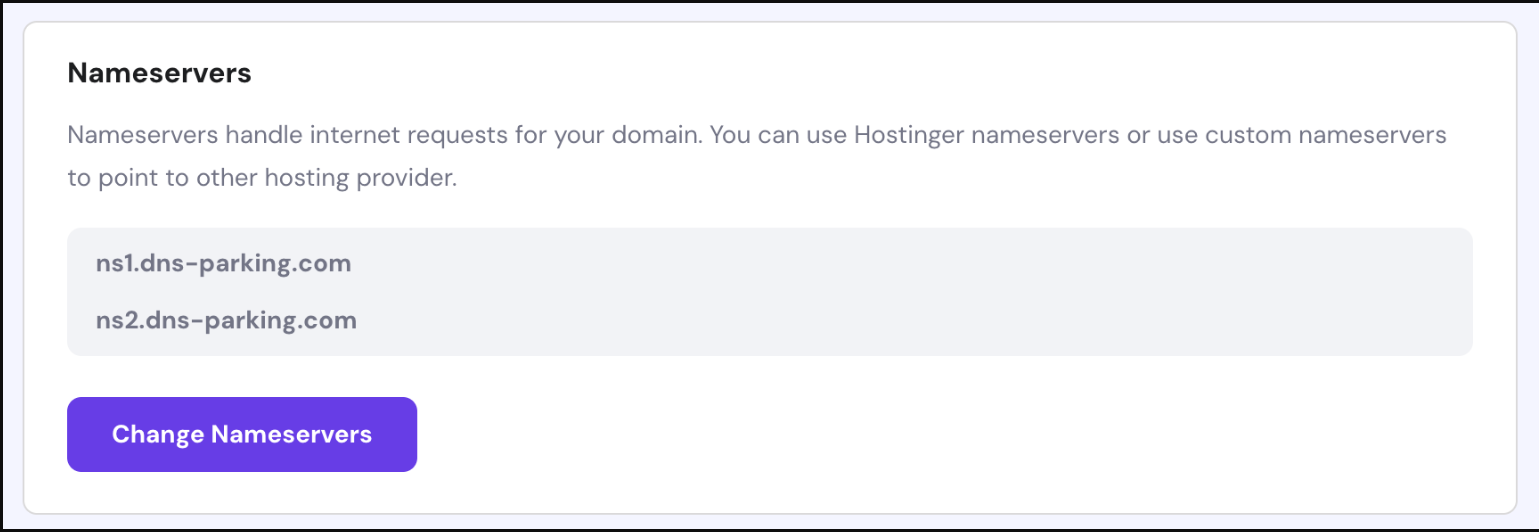
- Click on the DNS/Nameservers from the sidebar.

- If ns1.dns-parking.com and ns2.dns-parking.com is shown, then it is correct. If not, then click the Change Nameservers option.
- Enter the value that we mention above into the text fields. Press the Save button.

- After that, we change the MX records settings. Go to the same DNS/Nameservers menu. Then, check the following details.
- Name: @ for both records
- Priority 5 and 10
- Mail server: mx1.hostinger.com and mx2.hostinger.com
- TTL: default for both entries.
- If the details are incorrect, provide the above information by clicking the Edit option. After making the changes, click the Update button.
- If you are unable to find your existing MX records, go to the Manage DNS records section. Enter your MX settings, then click Add Record. Make sure you save this twice because we need two records.
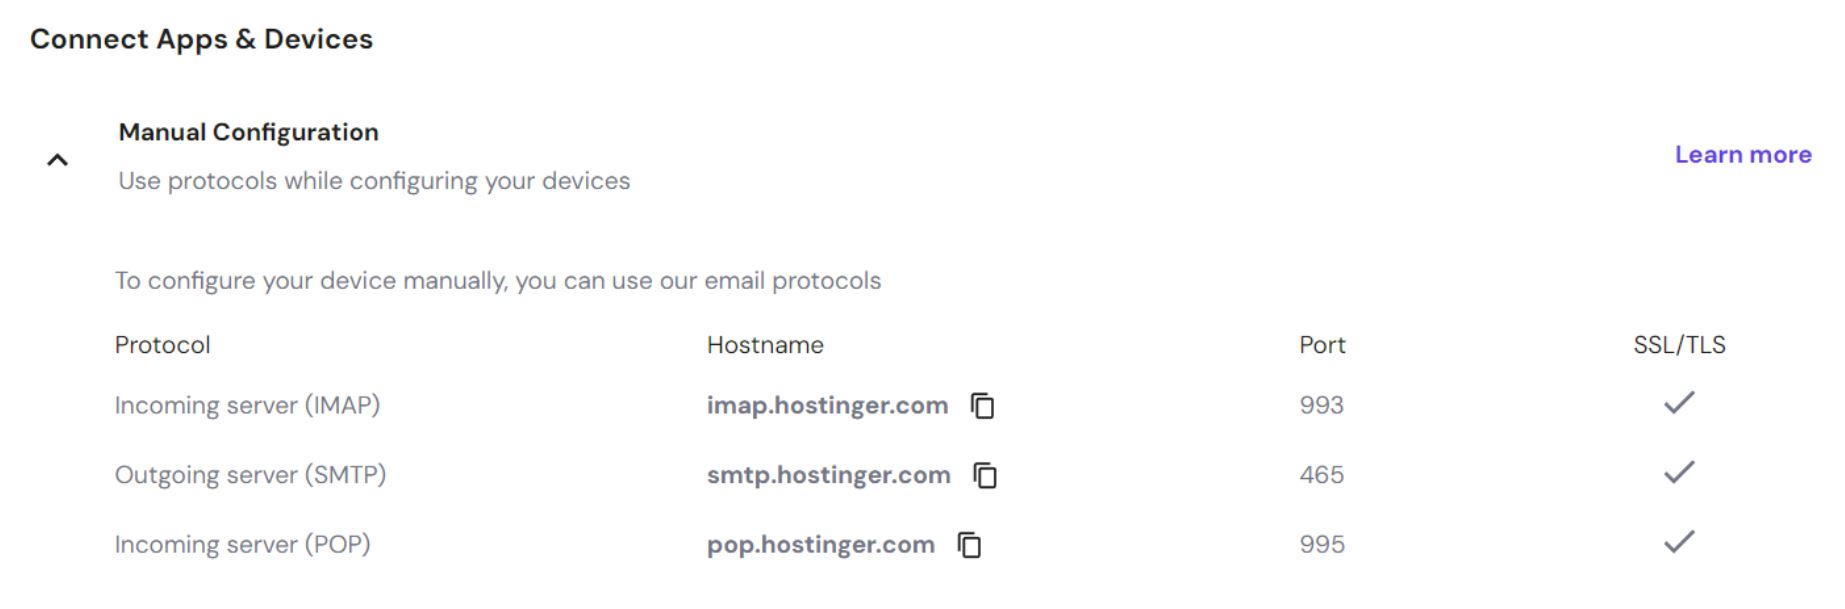
- Check IMAP/POP/SMTP Configuration: IMAP or POP is a must when configuring your account. So, for this, follow the steps below.
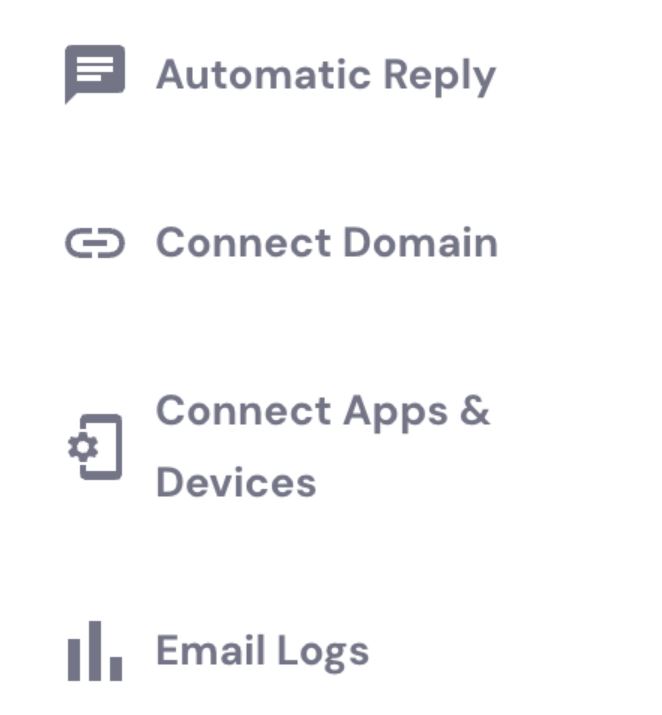
- In hPanel, click on the Emails from the top Menu button.
- Click on the Manage button, then select Connect Apps & Devices button from the sidebar.

- By scrolling to Configuration Settings. Click the Arrow button.
- Copy all the information and paste them to Notepad or any secure location.

After completing these prerequisites, proceed to the methods to add Hostinger emails to Outlook.
Manually Add Hostinger Emails to Outlook 2021 & 2019
Outlook’s interference features keep changing in each update. Therefore, the steps will be different in each version. But the process will be the same, which is to move Hostinger emails to Outlook. Here, we will explain the steps of the latest version of Outlook 2021, 2019, etc.
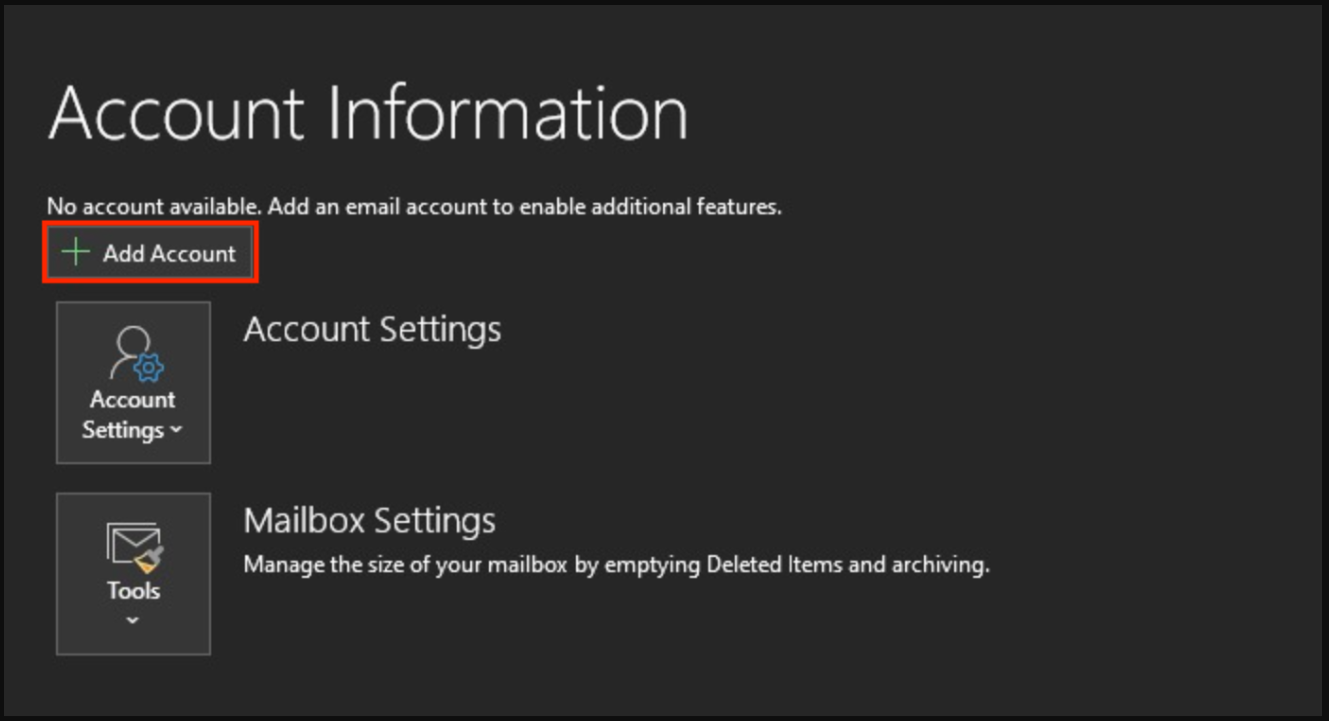
- Open the Outlook program and click on the File button and select Add Account.

- Enter your Hostinger email address. Extend the Advance option to Set up the account manually. click Connect.
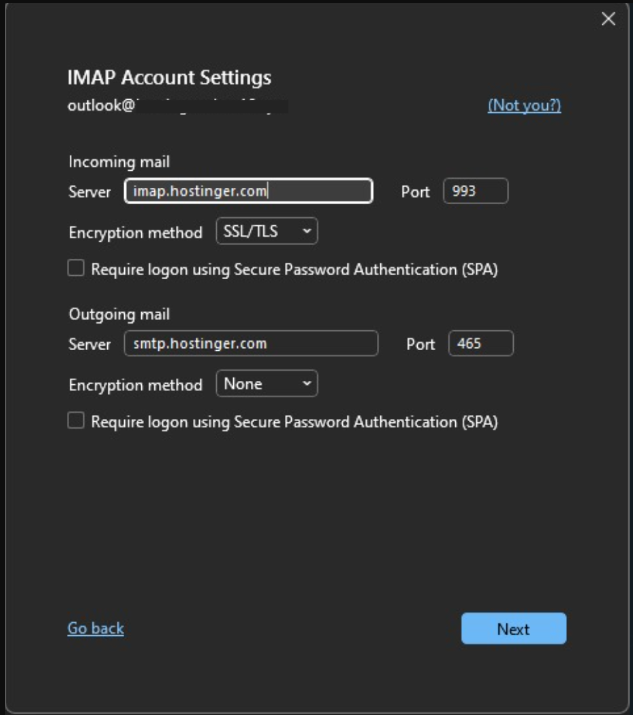
- Choose IMAP/POP, then enter your password. click Connect.
- Enter the IMAP settings
- Incoming server type: imap.hostinger.com
- Port number: 993
- Click on connection type SSL/TLS
- For the Outgoing server
- Enter: smtp.hostinger.com
- Port: 587
- Click on SSL/TLS

- Click Confirm. Enter your password again if Outlook asks you.
With these steps, your Hostinger email will be configured in the latest version of the Outlook. If you have the older version of the Outlook like 2016. Then additional steps will be required in the process. Follow the steps below.
Transfer Emails from Hostinger to Outlook 2016 and Older Version
- Open your Outlook and click on the Next button.
- Then, a message will appear stating that you want to connect your Outlook to another email account. Click Yes, then choose the Next button.
- Select the Manual setup or additional server types option. Click the Next button.
- Now, enter your name and your Hostinger email address. Select the IMAP/POP option.
- Enter the details of your incoming and outgoing server of your copied Hostinger details.
- Click on More Settings option to provide Outgoing server.
- Once providing all the necessary details, click on the Next.
- Outlook will check whether your emails work properly. Wait for the process to be done.
- After that, click on the Finish button.
These are easy and free solutions, however there are chances that you may encounter some issues. We will explain them in detail below.
Problems with Manual Methods
- This technique is time-consuming, as it involves prerequisites and steps to set up your Hostinger account.
- Due to connection issues you are unable to configure your account in Outlook.
- Users need prior knowledge about Hostinger and IMAP to understand the method.
Therefore, while the manual method is free to use, it has also drawbacks as well. This can be avoided by using the professional software.
Migrate Bulk Hostinger Emails to Outlook – Smart Solution
The above method had issues. But, this solution smoothly connect your Hostinger email in Outlook. Here, we use the Corbett IMAP Migration Tool. With this tool, you can easily set up all types of IMAP accounts into one another. Users don’t need professional knowledge to use the software. Because its user-friendly interface, allows non-technical users to easily use the program. So, let’s see the steps to open Hostinger email on Outlook.
Steps to Add Hostinger Emails to Outlook
- Download the tool and install it on your Windows computer.

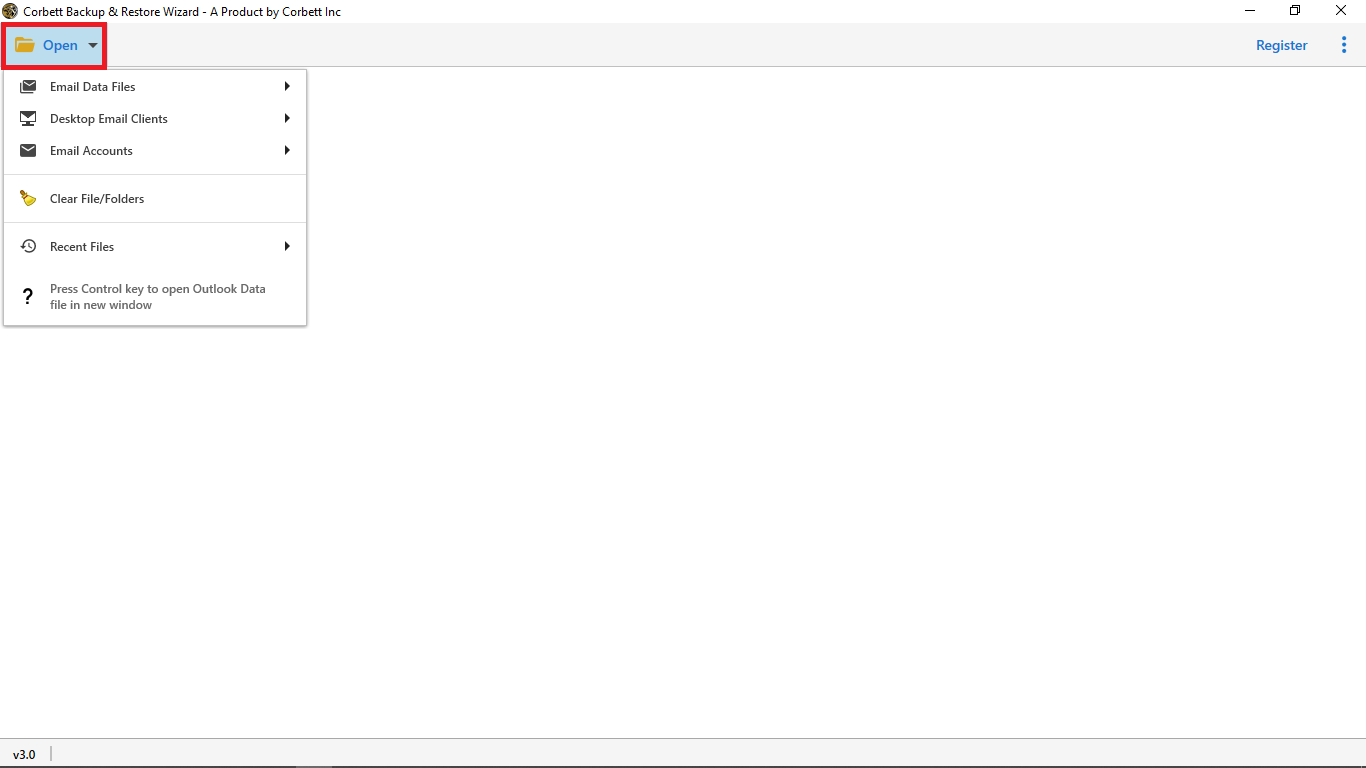
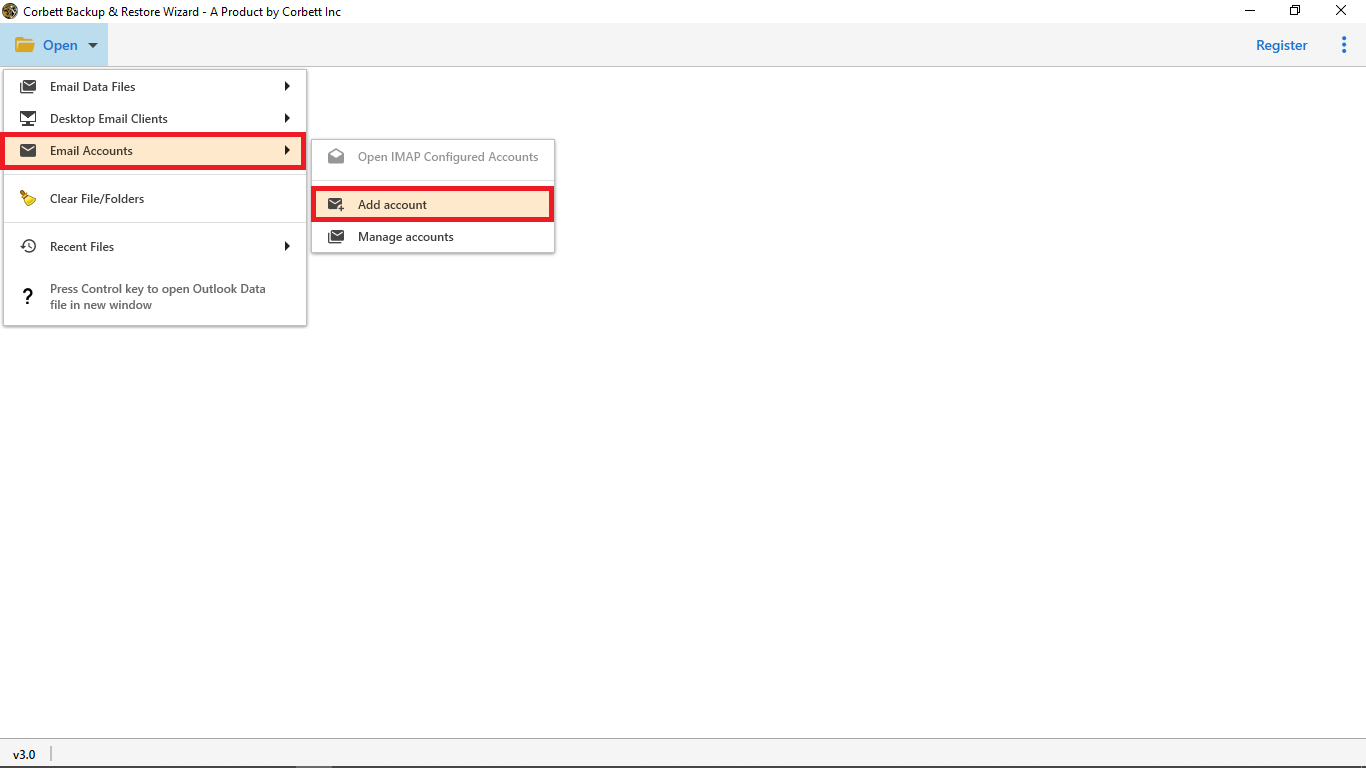
- Click on the Open button at the top of the screen.
- Select Email Account, then click the Add Account button.
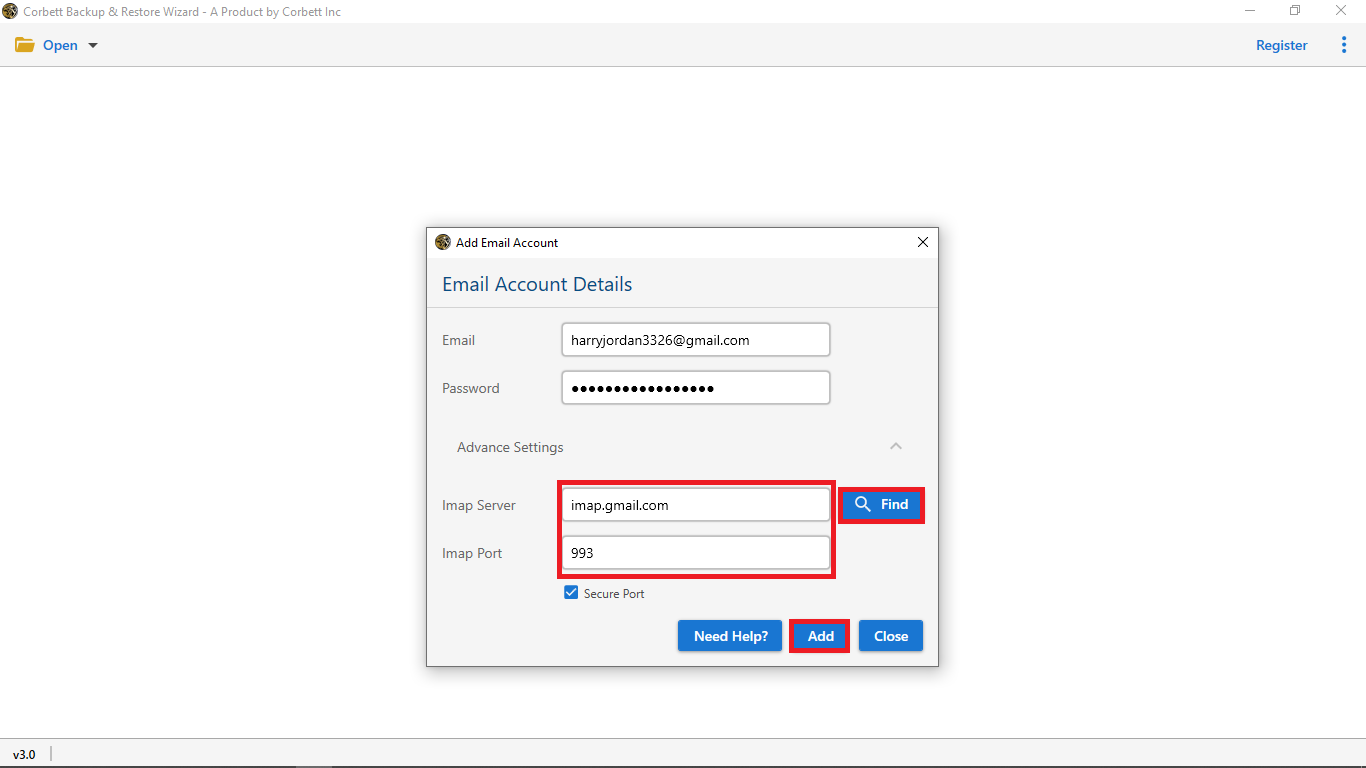
- Enter Hostinger email address and password, then click on the Add option.
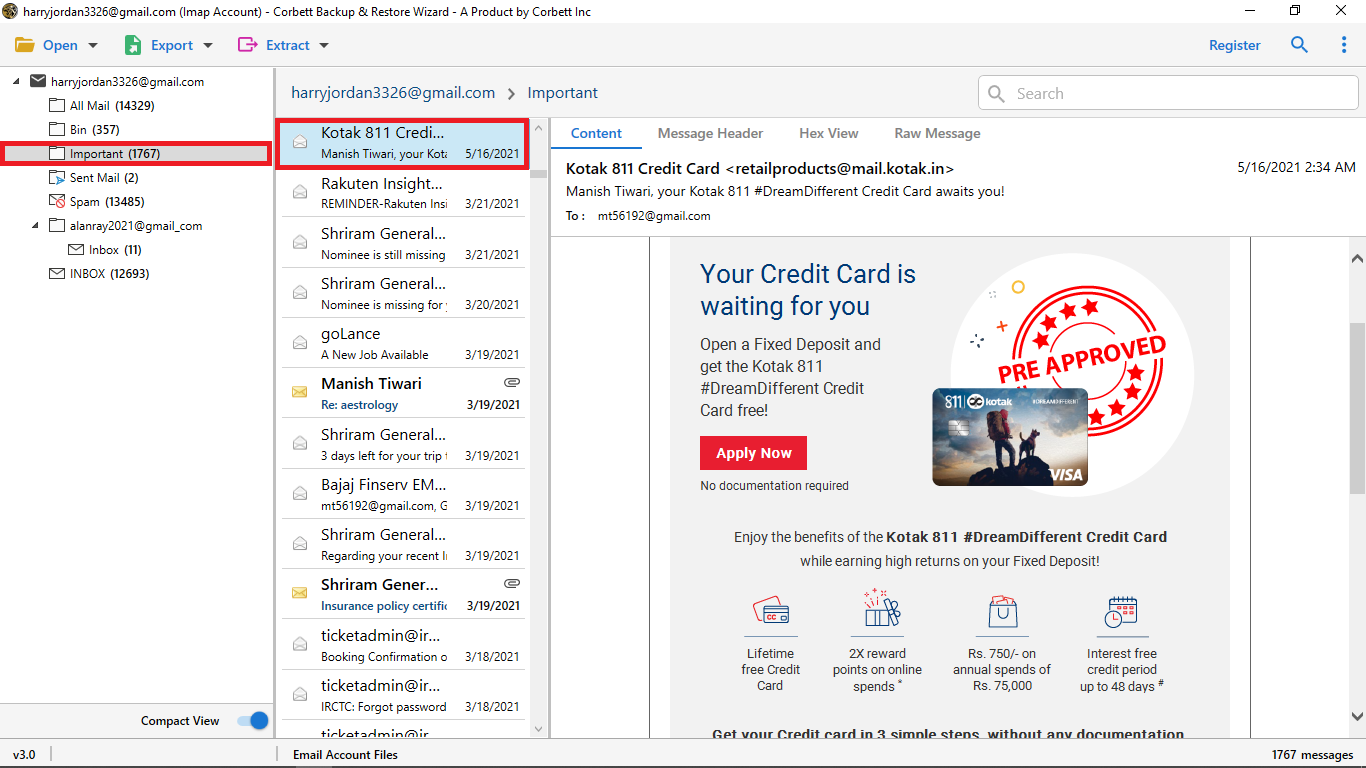
- After that, all your data will be displayed. Preview the emails.
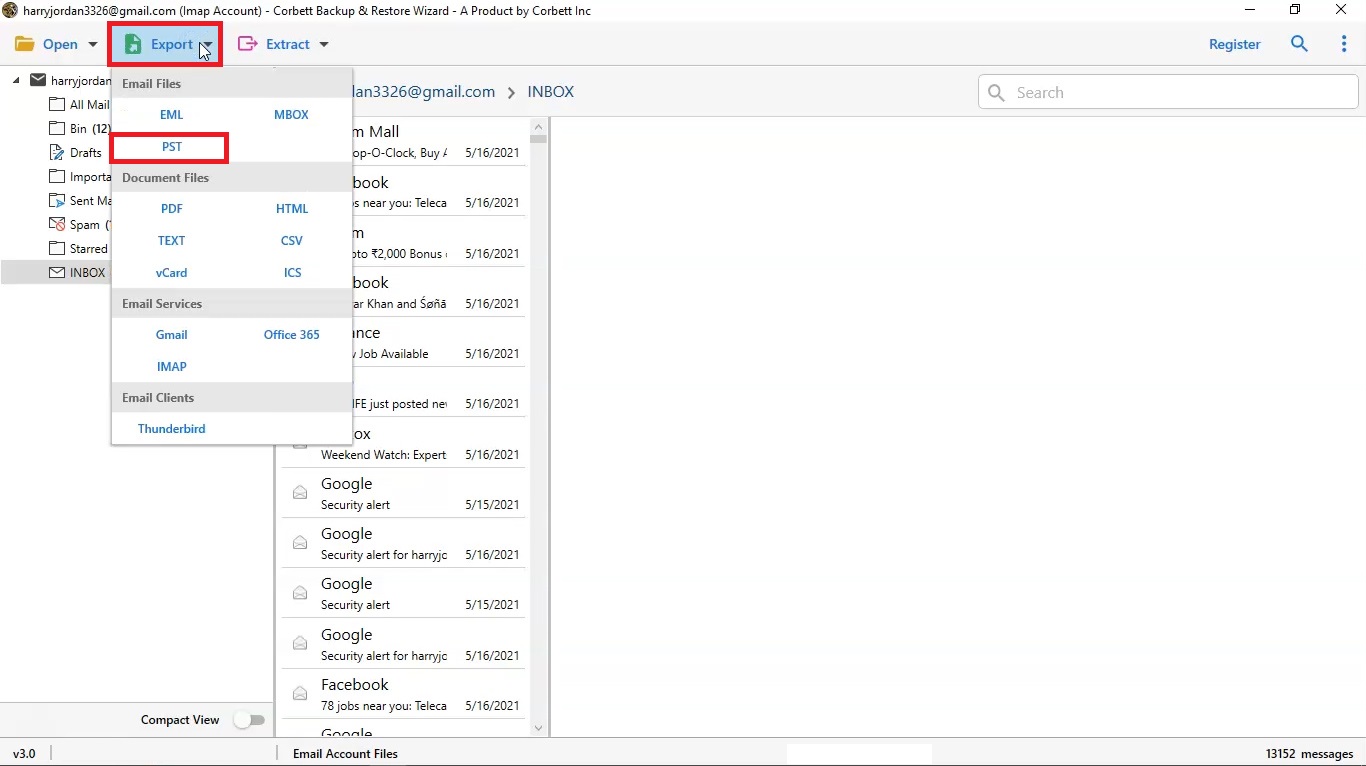
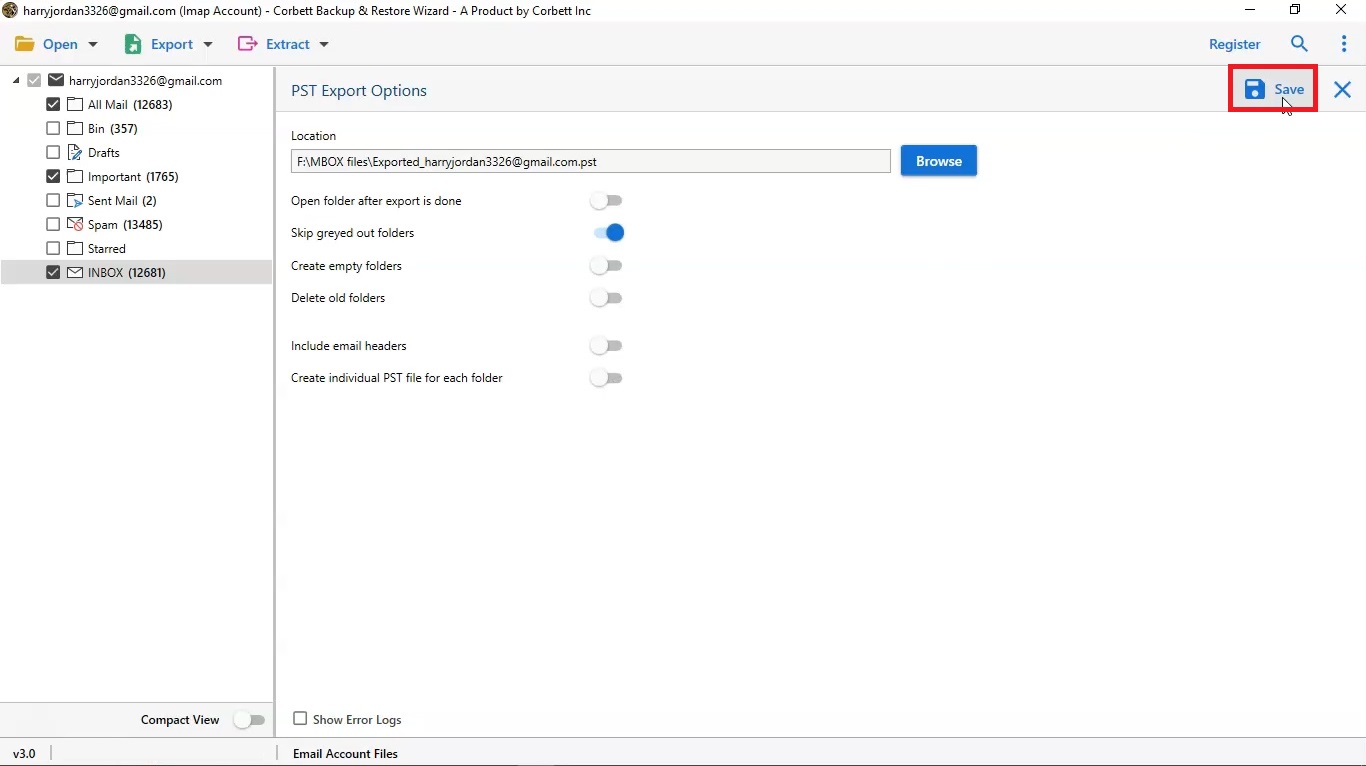
- Click on the Export option and select the PST format.

- Choose a destination where your file will be located.
- You can apply a filter if needed, then, click the Save option.

After successfully adding Hostinger email to Outlook, import the PST files into Outlook. The software also has various amazing features.
Concluding Words
Users may not know how to add Hostinger emails to Outlook. That is why, in this article, we shared the three best methods to connect Hostinger email to MS Outlook. We also discussed the reasons behind setting up your Hostinger email and prerequisites before following the process. Since the manual options arelengthy, the professional tool can quickly set up your emails without any issues.