Migrate Outlook Emails to Office 365 with 4 Flawless Solutions
Office 365 is a suite introduced by Microsoft where all your Microsoft applications like Outlook, OneDrive, OneNote, Powerpoint, MS Excel, MS DOC, and many more. Using this suite users can save their data and improve their productivity, collaboration, and communication. It is good for small businesses and enterprises where they can manage their activities from a centralized place.
Integrating your Outlook to Office 365 is a great choice. You can take advantage of many advanced features offered by Microsoft 365. To understand the benefits of importing a PST file to Office 365. Below we will explain in detail.
Benefits of Moving Outlook Emails to Office 365
- In one place, you will get access to all Microsoft products that can help you in your work.
- The suite has cloud computing technology which makes your account available on every device.
- Users can work in real time, such as co-authoring where you can finish your work quickly.
- For security measures, Outlook 365 provides excellent services to protect your important data.
- Office 365 provides 50 GB mailbox storage space, which you can expand further.
As you can see it is very beneficial to transfer emails from Outlook to Office 365 mailbox. Now, without wasting a lot of time, let’s move on to the methods that you can use to export your Outlook emails.
Manual Methods to Transfer Email from Outlook to Office 365
For the manual options, you can connect your Outlook.com to Office 365. Here, we will take the help of the IMAP server. Other than that, Network and the Driving Shipping features can also help you import PST files to Outlook 365. So, manually we have three methods available.
- Connecting Outlook.com to Office 365
- Import PST to Office 365 using Network Upload
- Save Outlook emails to Microsoft 365 with Drive Shipping
In the upcoming section of the article, we will explain each method with proper steps.
Sync Outlook.com Emails to Office 365
In this method, we use the IMAP protocol to configure the Outlook account Office 365. Following are the steps.
- Sign in to Microsoft 365 Administrator account.
- Click on the “Admin” option, then select the “Setup” button.
- Choose the “Migration” option from the admin center.
- Click on the “Email” button under Migration. Then, press the “Get Started” button.
- After that, an Email source window will open. Select “Import my email messages”.
- Click on the “Data Services” and select the “Outlook”.
- Enter IMAP server: “outlook.office365.com”, Port number: “993”, Security: “SSL/TLS”. Type the email address and password of your Outlook account. After entering the details, click the “Save” button.
- Select your Outlook.com account and enter your credentials. Hit the “Start Migration” option.
With these steps Outlook.com account connects with Office 365 and all your emails will be moved in the program. There are other ways to Migrate Outlook emails to Office 365. But first, we will save our Outlook emails to the PST file to make the next method easier.
Export Outlook Emails to PST Files
The purpose of downloading the emails in PST files, this is because both the Network update and Drive shipping options use PST files to move bulk Outlook emails. That’s why, follow the steps below.
- Open Outlook, Click on File tab >> Open and Export, and select Import/Export Wizard.
- From the next Window, select Import from another Program. Click Next.
- Select Outlook Data File from the list.
- In the Import Outlook Data file Window, select the appropriate option as per requirement.
- Select the Outlook data files and select the Office 365 account from the drop-down. Click on the finish button.
Once you have exported the PST files, now we upload them to Office 365 using Azure Storage. It is a tool developed by Microsoft which is free of cost. Then, follow the steps below.
Import PST Files to Office 365 using Network Upload
- Go to the Exchange Admin Center. Click on the “Roles” >> “Admin Roles” >> “Import/Export”.
- Select the user which is assigned to import the PST file. Hit the “Add” button.
- Now, in the home page of Office 365, click “Data Life Management”. Then, “Import” button.
- Choose “Import PST Files”. Enter the job name and hit “Next”.
- Click “Import Job Type” and press the “Next” button.
- Select the “SAS URL” and copy your URL. Click on the “Azure AzCopy”.
- Now, copy the PST file that you have saved. Open the Azure app.
- Open the Command prompt, using the cd command located in your external folder of the desktop where azcopy.exe software is located.
- Run this command: AzCopy copy “pathToFolder/ContainingPST” “SAS URL” –recursive=true.
- Download the installer and choose “Install for me alone”. Launch your Azure Storage Explorer.
- Click on the “Blob Container”, then “Shared Access Signature URL”. Paste the SAS URL that you copied.
- Hit the “Next” button and then Connect your account.
- Map your PST to the user’s mailboxes to ensure PST is properly imported.
- After that, give the details of the File path, Name, Mailbox, and Target Root Folder to import your mail items.
- After uploading the file, choose “I have access to the mapping file”. Then select the “Next” button.
- Click the “Select Mapping File” option. Click on the “Validate” option and hit the “Next” option.
- At last, press the “Submit” button and then “Done”.
This method is lengthy but can help you export your Outlook emails to Office 365 mailbox. There is another method that you can use to move your PST file in Outlook 365.
Transfer Outlook PST File to Office 365 with Drive Shipping
The Drive Shipping Method is a procedure that allows you to import PST to Office 365. It generates a copy of PST to the disk drive and then physically ships the drive to Microsoft. The process takes between 7 to 10 days to upload the PST file to the O365 account. Here are the steps to migrate Outlook emails to Office 365
- The initial step is to download the storage key and PST Import wizard.
- Copy the PST data file to the hard drive.
- The next step is to build the PST importing file.
- Now create a PST import job in Office 365.
- The last step is to ship the hard drive to Microsoft.
The above three manual methods are free to use. However, you can see that they are quite long and time-consuming. Moreover, non-technical users may have issues following the software. On the internet, there is an alternative option available which can quickly and effectively move your emails.
Transfer Emails from Outlook to Office 365 – A Smart Approach
To make your process shorter, Corbett IMAP Migration Software can help you. With this tool, users can directly export their Outlook emails to Office 365 without any issues. The software is made up of such advanced technology that you can easily migrate your emails with all meta attributes.
Moreover, there is an individual option available to extract email addresses from Outlook and download attachments from Outlook without any size limitation. A quick search option is available that lets users find their important messages effortlessly. Download this Windows-based utility which is available in all the versions of the Windows OS. Following are the steps to migrate your Outlook emails using this professional tool.
Steps to Migrate Outlook Emails to Office 365
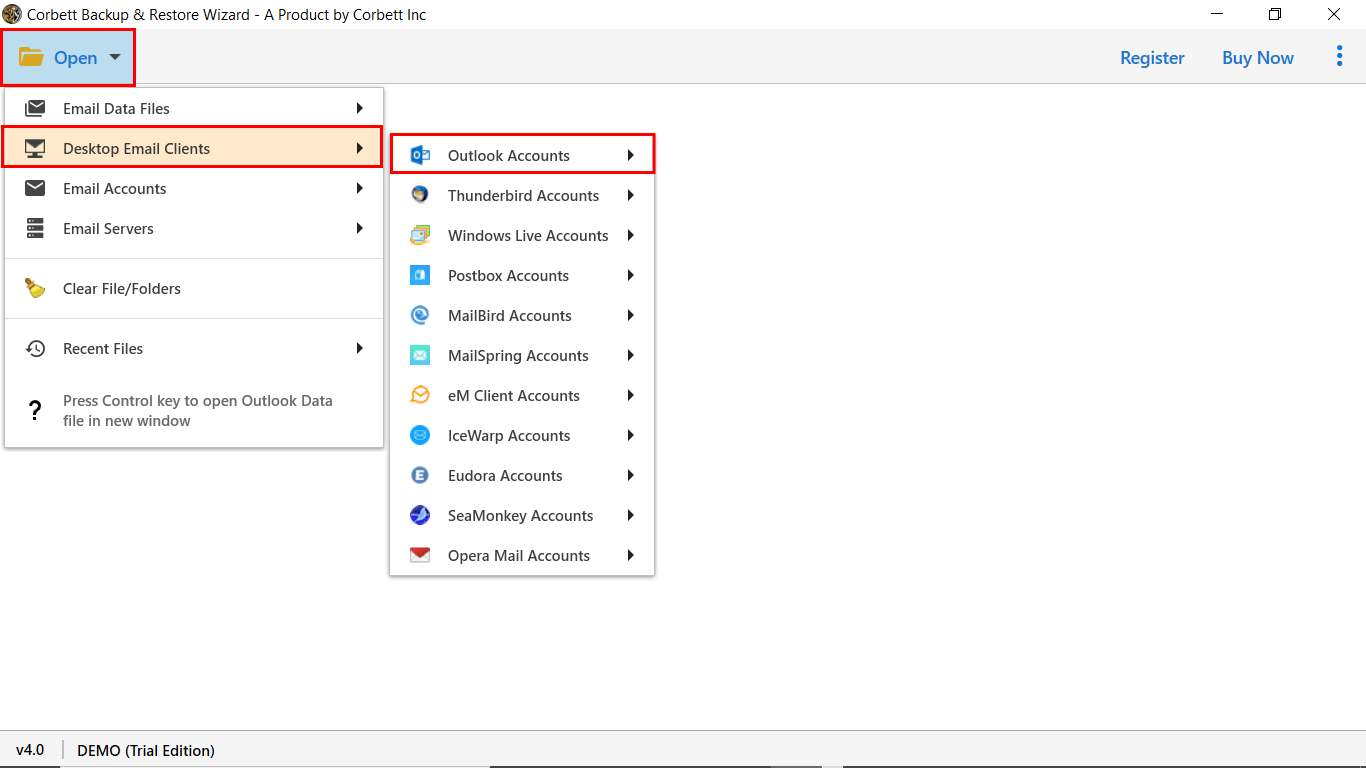
- Run the application on your computer and click on the Open button.
- From the list, select Desktop Email Client and Outlook upload configured profile data.
- Afterward, Preview the data files stored in the Outlook PST account.
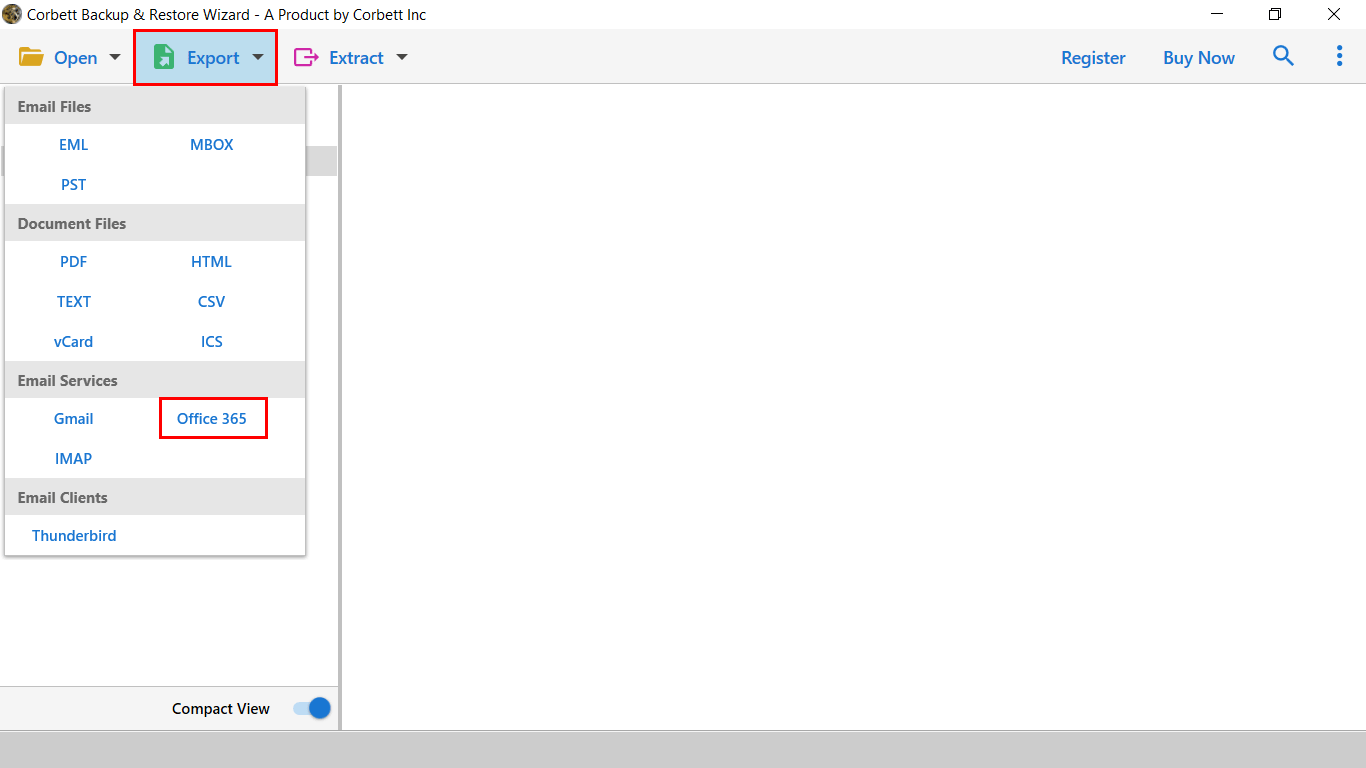
- When you are done with the preview panel. Go to the Export Tab and select the Office 365 option.
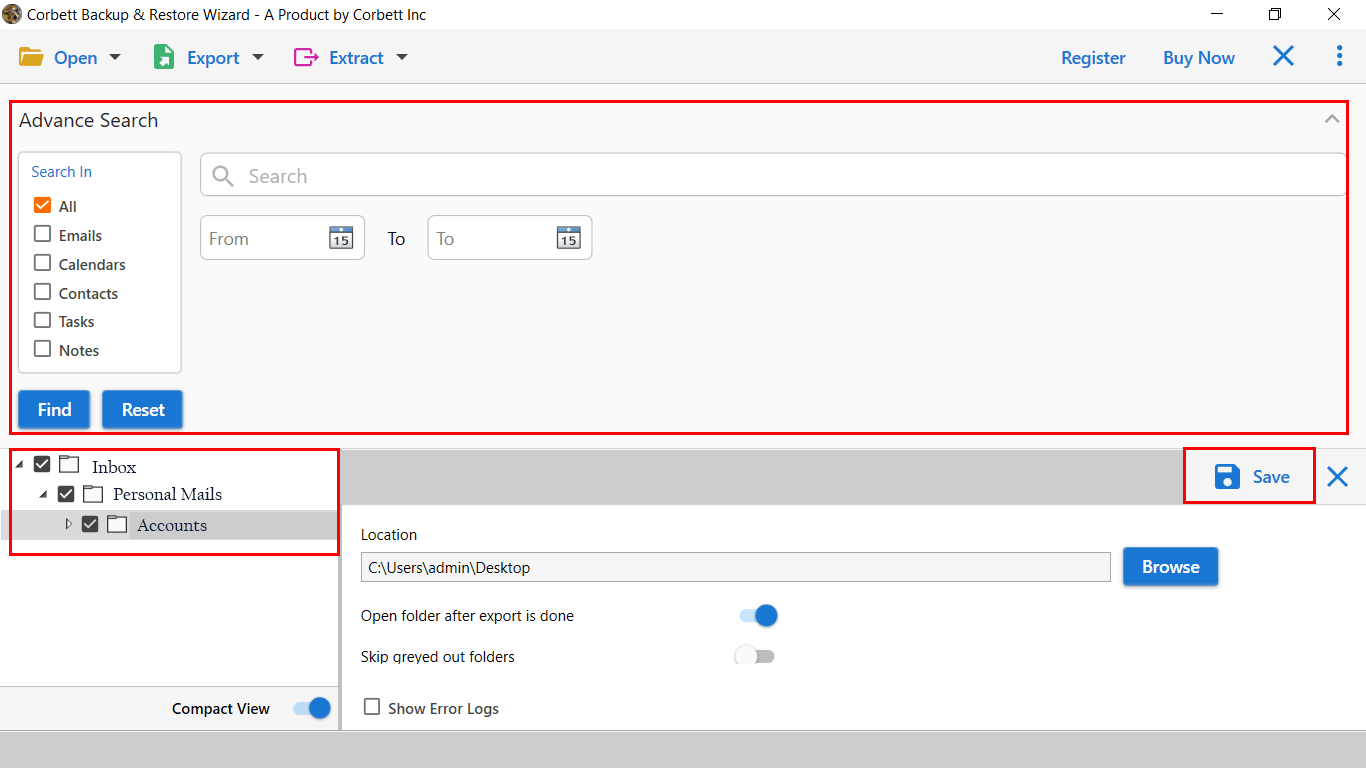
- Enter your Office 365 credentials and apply the data filters.
- In the last click on the Save button to start the migration process.
When the tool successfully imports PST to the Office 365 account a completion message will pop up when the entire process is done.
Final Words
Office 365 is a well-known cloud application with numerous benefits. That’s why a majority of businesses want to migrate Outlook emails to Office 365. Above, we have mentioned different methods to transfer the emails. Some users may have issues with the manual procedure which is long. To perform rapid and secure migration from PST file to Microsoft 365 the professional software would be a great choice.


